Step by Step Installation of MongoDB On Windows server r2
1) Download the MongoDB from its official site according to your Platform. You can download it from Download MongoDB .
2) Now you have the Downloaded .msi file of MongoDB so open that file.
3) Click on Next.
4) Check the Licence Agreement and the Click on Next.
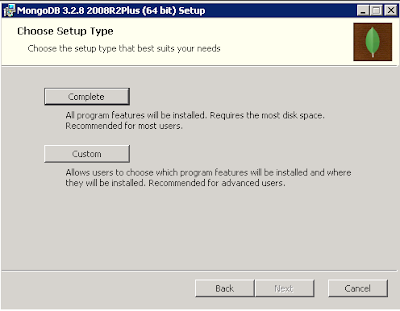
5) Click on Either Complete or Custom Verision whatever you want to install.
6) Click on Install and then it will start installing mongoDB in your system.
7) Then Click on Finish.
Now You have installed .msi file on your system check that mongodb is install or not by confirming that mongoDB Folder exists into “C:\Program Files” or not.
9) Then create the Directory "data" using "md data" Command.
10) Then go to data directory using “cd data” command.
11) Then create another Directory into data which is "db" using "md db" Command.
12) Now you need to tell system that MongoDB directory exists at this path So for that you need to do the Changes into Environment Variables.
13) You can go there Control Panel -> System and Security -> System -> Advanced System Settings -> Environment Variables -> Into System Variables.
14) Create New Variable called MONGO_HOME and in that put path till bin Directory of MongoDB
15) Then
Click on OK then Edit Path Variable of the System Variables using %MONGO_HOME%\bin.
16) Then Click on OK.
17) Then
You need to start the server MONGOD before using mongo shell.
18) So for that You need to open another Command Prompt
as Administrator.
19) Then write mongod the hit ENTER.
20) Above image shows that your mongoDB server is up and running
of 27017 port No.
21) Then again open another Command Prompt as
administrator and then go to the bin directory of MongoDB using CD Command Cd C:\Program
Files\MongoDB\Server\3.2\bin and then write mongo and then hit enter.
So now you have mongoDB is install on your
system.
Enjoy...!!!
Need Help Comment your Concern Below and I will
try to resolve that as soon as possible.


Comments
Post a Comment